Pages

Sunday, 10 October 2010

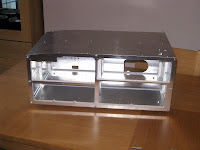
Case almost complete.


A couple of photographs of the case which is almost complete. I need to cut some of the threaded rod at the back and take some burr off with a file (is that how you spell it?). The PSU doesn't quite match up with the holes on the rear panel (bugger) but it's not out by a massive margin so I just need to file them a little bigger. But everything else fits just fine so once I've done these odd little jobs, it's off to get powder coated. If they can do it.... hopefully.... I'm a little worried about that one!

Thursday, 23 September 2010

Final two pieces of the puzzle.


Fingers crossed these are the last 2 pieces that will be cut tomorrow at the routing services company in Newport. I wanted to get this done as quick as possible since it will be full steam ahead for the Ryder Cup build up next week. The company is very near the Celtic Manor so traffic next week will be really busy.

I've had a slight design change of the air intake that will hold the fan. It now has less holes and they are spaced more closely together, hopefully this will help the airflow.

Last stage....(thank the Lord!!!) after having these cut will be to get the aluminium sheets powder coated.

I have set myself a deadline of October the 12th to have this project finished. The students start the new term on that date and I won't have any more time to work on it. So lets hope nothing unforeseen happens to it before that date.

Thursday, 16 September 2010

USB Hub, UK PAT Testing, Fan....of the computer kind!

I just bought a D-link 7 x USB Hub to go in the case. I hope to pick it up tomorrow. I actually only need 4 ports, 1 for the CCU2, 1 for the Saitek Radio, another for the Simkits 32input controller and one more for a USB Simkits turn coordinator. But I figured that at some point I may want to upgrade to all USB instruments in the future and if I buy 2 of these D-link Hubs I will have enough to run all the neccesary hardware. Fingers crossed that I can run a USB instrument and CCU2 board together. I need to speak to Simkits to make sure that is possible.

A colleague has very gratefully offered to PAT test the Primary 6 Flight Simulator once it is completed. We have the machine at work and I am hoping to pass it with a current UK electrical certificate to make sure it is safe to use and that it won't turn me to ashes!!! Result!

I have completed within CAD to design a fan air intake for the case. I've been a bit concerned that the PSU may get a little hot when running so just in case I have added a 120mm fan at the back to cool everything down and allow for some flow of air. I noticed that Simkits have a grill in the back of their TRC472 for some air flow. I thought I better be safe than sorry.

Saturday, 4 September 2010

Logo Design


I designed this new logo to put on the case once it has been painted. I was looking for a simple, clean design. The orange 6 is meant to represent a spiral off an aircraft engine spinner. I think it works quite well.

You may have noticed I have changed my blog to suit the new logo.

Machines

Some people have asked me about what machines I have been using. Here are some photos. I'm very lucky to have the use of these magnificent machines in my workplace. I work in a completely different department so it's a bit of baptism of fire. But I've learnt alot already.

This red one is metal cutter, and the other on is a metal folder.

Pedal to the Metal


I've made some great progress with the case in the last few days and I'm quite pleased with the results so far. I bought some aluminium sheet (2000mm x 1000mm x 1.2mm thickness) from a company in Cardiff. It was only £35! Bargain.

I used our metal cutter in work (very impressive machine - chops throgh sheet metal like a hot knife through butter ) to cut all the pieces to size. I then used a metal folding machine to bend the pieces at right angles so that it can be "pinned" to the MDF frame. (I am going to use 3mm machine screws to hold it all in place.

I have also designed 2 more pieces in CAD to fir the front and rear of the case. I made the outer edges 1.2mm thick so that it will be flush (fingers crossed) with the pieces on top and on the bottom. These two extra pieces need to be routed by InStyle routing services.

Next stage after this is to get the aluminium sheets powder coated white.

Oh and by they way you may have noticed that the MDF has now been painted with 2 coats primer. I used a small cheap roller to put the paint on evenly. It's not the best finish but these struts will never be seen anyway...so who cares.

If I was going to do this project again I would make the three struts out of aluminium. Not because it doesn't have strength, but because it would have looked much more like a real product rather than a project...if you get what I mean? I must admit the threaded rods are complete overkill, I could have got away with leaving them out. Oh well. It ain't going to fall apart, that's for sure.

Friday, 27 August 2010

The BONES of my simulator!


Just completed cutting the last piece of threaded rod with my angle grinder...I mean... my Dad's angle grinder. Have to buy one of my own one of these days. Next stage for the case is to paint it with some MDF primer and then paint it white. I bought one of those value paint rollers from B&Q that can use and then chuck after I have finished with it. I used the same method when applying paint on my last simpit and it worked really well. I have to source some 1mm thick aluminium sheet to go over the top and use the sheet metal folder in work to drape it over the top of the skeleton.

Friday, 20 August 2010

Radio and switches panel almost complete!


Windows 64bit and Simkits TRC software compatability

Well... that was a bit of a shock! I discovered yesterday when trying to run Simkits's TRC software with the old CCU2 circuit board that 64bit is not supported. Hence why they moved to USB instruments. There is absolutely no way I can re-buy all the instruments so my best option is to buy an OEM copy of Windows 7 32bit and dual boot it with my 64bit copy. I am hoping to achieve this on a second partition ans using NeoSmart technologie's EasyBSD software to rename the boot selector to read Primary 6 Desktop Flight Simulator at the boot screen. I will probably have to also buy a new copy of FSX (groan) to go with it. Not a major problem...but... bugger.... all the same! To think I was telling one of my colleagues that nothing has gone "stupidly wrong" so far. Obviously I spoke too soon.

Saturday, 14 August 2010

Thursday, 12 August 2010

Super Sexy in Black


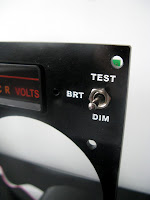
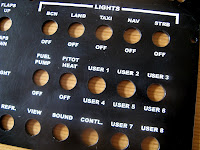
Had these new panels made today with work's laser cutting machine... (Thank you again Tim!) I have buffed out the black acrylic's glossy sheen with some wire wool. It has a brushed matte effect now. It looked way too shiny before, so I think this now looks much better and should be less prone to showing up scratches. I'm popping it down to Laser Are Us tomorrow morning to get it stencilled with the letters. I had a bit of a sleepless night yesterday worrying about the fact that the Primary 6 panel was changing from grey to black (just how sad am I???!?!) But I am really, really liking the black now. It looks much more uniform with both panels in the same colour. It's really starting to look like a super duper sexy piece of kit. Obviously that is my opinion and i am biassed, but my work colleagues seem impressed also... perhaps they are just being polite....

Wednesday, 11 August 2010

Fade to black.


Small caveat today with the primary 6 project. I took a day off work to go down to Lasers Are Us in Pyle and unfortunately they said it may be difficult to paint the acrylic panel without it A. looking kind of crap, and B. The paint may not stick to the panels and just rub off... so... bugger. My best option is to have the material in the colour that I want and then engrave into the panel. Once that is done I can colour fill with white paint and they should look superb. Only problem is that my plastics supplier doesn't have 3mm acrylic in grey only black so I have to go for black for both panels. Shame. It would have been nice to have the original colour of the Cessna on the left side but sometimes you can't have everything. I think I have been lucky with this project so far. A couple of holes missing here and there but everything fits together great..so..happy days. Hopefully I can get some more panels laser cut in work and they can start to engrave them. I now have 12 x 600mm x 300mm black (gloss) pieces of acrylic as the supplier didn't have any offcuts of this particular one. Woo Hoo. It's actually quite cheap and they sold it to me in half sheets. So... not a major problem, just a slight, ever so slight direction change. I have included a pic of what it will look like in black. Actually looks kind of dashing.

Friday, 6 August 2010

MDF cabinet.


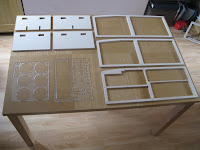
These are the MDF pieces I had cut from ISL routing services in Newport. They've done a fantastic job, really pleased with how they have turned out. I need to mill some holes for the threaded rod as well as 2 holes on spar 1 that I accidentaly left out of the CAD design... ooops. As you can see on one of the photographs i have tested to see if some of the push button switches and the Saitek unit fit into the panel, which they do... perfectly. Blimey laser cutting and routing these parts are so much better than using a jigsaw!!! Everything fits together this time!

Wednesday, 28 July 2010

First pieces of the puzzle.


I've had much better luck today. These are laser cut acrylic panels (3mm) that I had cut this morning. I need to check that everything fits correctly according to my plans and then the next stage will be to have them painted and stenciled with some lettering.

Tuesday, 27 July 2010

Small design change.


After cutting the panel this afternoon I realised that 3mm acrylic is not quite as rigid as polycarbonate and certainly nothing like 4mm aluminium. I've added 2 new screw holes to the structure as well as a minor design change to where the radio panel bolts to. This will add some strength to front of the unit. I'm worried that with such a large hole on the right side, the acrylic may bend when you push it in the middle. When operating switches it may start flexing which doesn't really scream quality!!!! Hopefully this will rectify that problem.

Ooops!!!


Oh dear... So this is my first test using the laser cutter here at work. Unfortunately it hasn't cut through very neatly, we tried to cut it twice, to get this hole. I hope I haven't ruined the laser (sorry Tim!!!). It looks like a bit of a mess and it's £300 for a new replacement part!

So, I'm straight back on the phone to Amari Plastics to get some 3mm acrylic. We tried a test piece with some gash pieces and it cuts it very well. I should have listened to Tim in the first place. We also had a slight problem with the CAD file where it missed out an arc. I need to rectify that before we have another go again tomorrow using acrylic.

Thursday, 22 July 2010

Polycarbonate Sheet


Bought this little offcut of 3mm polycarbonate (Makralon UV) today from Amari Plastics in Cardiff for the bargain price of a fiver! I was meant to do some tests today with our laser cutter but there has been a slight.... hiccup. It will be delayed till next Tuesday. I have to say that this polycarbonate material is a tough cookie! The panels are going to be nice and strong.

Wednesday, 21 July 2010

SVmapper program

Came across something called SVmapper the other day on the X-plane.org forum. It's a superb piece of software that allows you to assign toggle switches to keys on the keyboard. It's great for getting around X-plane's switch limitations when using toggles. This has been around a little while now and it is used with all sorts of simulators. A lot of DCS: Black Shark cockpit builders use it because they have nothing like FSUIPC to utilise.

Project Magenta Software Build 70

Project Magenta has uploaded an update to their General Aviation Glass Cockpit software - Build 70 now allows autopilot controls (highlighted) to be added to the G1000 unit. I have amended my project to allow for the new controls.

It's been a while.

Now that it's the summer months, my workplace has become very quiet so I am using this downtime to crack on with the construction of the primary 6 project. I'm also continuing with the design phase of the Cessna glass simulator and have made some steady progress. We are lucky to have a low to medium strength laser cutter here at the university and I'm hoping to do some tests with it tomorrow. I'm using polycarbonate which may be too strong for our laser but we'll see how well it works. I've been told acrylic is softer and easier to handle but I would like to use Polycarbonate to make the panels strong.

The MDF is being cut by a CNC routing company in Newport. They usually make signs but they are very kindly taking on this small job. Initially I wanted to get the MDF parts laser cut too but the bed size of 600m x 300mm is too small. I am hoping the CNC router will cut accurately because there are some fiddly places, especially with spar one where the warning indicator sits. Again...we'll see.

I've made some CNC drawings with our large format printer that I am hoping will help me with the design process of my larger project. It's nice to be able to physically see the project to scale for once.

Report back with some images once I have something to show.

Saturday, 27 February 2010

Electronics inside the P6 project


This is just to show the electronics and power supply positions inside the Primary 6 project. There is one PSU, which is an old stly AT 200W supply stripped from a computer. This drives the servos inside the simkits instruments which is the long circuit board loacated on the right hand side . The one to the left is Leo Bodnar's 32 input controlle. It connects all of the switches. Obviously I haven't shown all of the cables and wires that will make all of this work. It's going to be quite busy inside this chassis. I am also wondering if i should put a 120mm exhaust fan to try and dissipate the heat that will be generated from the PSU. This will be wired up to the supply via a molex connector and will come to life as soon as i turn it on.

Sunday, 21 February 2010

Primary 6 - construction of the housing.


Lately, i've been working on the final piece in the puzzle for this project, which is the housing that will hold all the panels, electronics and power supply. I initially was going to make it out of plastic but I went back to a material that is the backbone of simpit construction, wonderful MDF. It's such a versatile material and i have found it very easy to work with in the past.

I've been racking my brain trying to work out the best way for it all to come together and i decided on a housing made up of 3 MDF spars with aluminium rod holding the pieces upright.

It's amazing how many problems can be solved when designing usingwith a computer. When constructing the front spar in CAD I failed to notice the very tight clearance of the warning indicator, and after pieceing it all together in Sketchup, I noticed i had to go back to the drawing board. There was no way it was going to fit. I think I have solved it now but if this was a couple of years ago I probably would have only found that out AFTER cutting the wood.

Wednesday, 17 February 2010

current CAD drawing of my larger project.


Current CAD drawing of my larger Cessna Glass Cockpit project based on Cessna 172Sp with Garmin G1000.

Monday, 15 February 2010

More work on the Primary 6 project.


This is a render of the switch panel on the right hand side. Eagle eyed among you may recognise the Saitek Radio unit that is an off the shelf product that I am incorporating into the panel to save money. It's a great product (I haven't turned it on yet!) that blends nicely with the dark black/gun metal grey switch panel. There is a few discrepencies that I found while working on the lettering such as the second row of toggles are too high. I need to adjust that in the CAD program before getting it sent to be cut. I'm also not sure what to do with the two empty holes on the right side. Maybe name them USER 1 and USER 2 and rename the circuit breakers to USER 3 and 4. I could always utilise more switches.

I may also change the branding at the top. It's currently named as Rotro Avionics (Rotro standing for RojanTrojan my online name in flight sim forums). I am looking for something that sounds more professional... I thought maybe Garmin?!?!? Just kidding! Something a bit more striking and not so much of a mouthful anyway. NMK MkII stands for NO MORE KEYBOARD, but I fear that is wishful thinking. I have made a MKI which is a smaller design. take a look at that in my older blog @ www.cessnasim.blogspot.com.

Please excuse the geometry of the render on the first image. It all looks very odd... switches pointed in the wrong direction and so forth. It's just an amalgamation of two front images of both panels from my photo pragram. I wanted to quickly see what they would look like together and thought i would post the result. Looking quite sharp, I think.

Thursday, 11 February 2010

Some CAD work on the avionics panel

Just a quick CAD drawing that I did today (it was very quiet in work!). I only have a Qcad trial in work so it kept closing every 10 minutes, but I managed to get most of the switch holes in place This is the second panel that houses all the toggle and pushbutton switches that sits alongside the primary 6 panel. It will be painted in black with white lettering. I've been swapping around different switch configurtions and positions to come up with the most suitable design. I am hoping to use these two panels as a testbed for my Cessna Glasss Cockpit project to see how the laser cutting company handles my CAD files and materials. I may be able to go for some sort of plastic panels rather than aluminium, maybe out of polycarbonate to have backlighting on the stencilled letters. It would certainly save weight. My old project was very heavy with just the sheet metal alone. The laser company said that they could do backlighting if I leave the painting and finishing up to them. Even though I already have the left side panel cut out of 4mm aluminium and painted, I may get another one done from these CAD drawings. The painters (a car re-spray company in Bridgend) only painted and baked one side, so it's beginning to chip off at the top. That is NOT good! It was a bit of a rush job to be honest. I still haven't opened my Saitek radio unit yet, as it's a birthday present...damn! I got the good wife to do a rough measure of the outline so I could plumb the numbers into the CAD software to get an outline of the unit. I am hoping to get some photos done of the 3d render mockups so i can take them to Lasers'R'Us (that's their real name!) and start the ball rolling and get some costing done.